La caja de herramientas de Sextante
Introduction
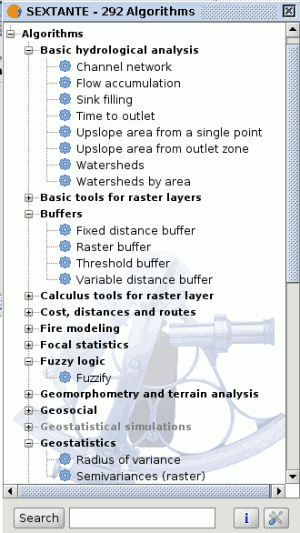
The Toolbox is the main element of the SEXTANTE GUI, and the one that you are more likely to use in your daily work. It shows the list of all available algorithms grouped in different blocks, and is the access point to run them whether as a single process or as a batch process involving several executions of a same algorithm on different sets of inputs.
SEXTANTE toolbox
Depending on the data available in the gvSIG View, you will be able to execute an algorithm or not. When there is enough data for the algorithm to be executed (i.e. the algorithm requires raster layers and you have raster layer already loaded into the View), its name is shown in black, otherwise, it is show in grey.
In the lower part of the toolbox you can find a text box and a search button. To reduce the number of algorithms shown in the toolbox and make it easier to find the one you need, you can enter any word or phrase on the text box and click on the search button. SEXTANTE will search the help files associated to each algorithm and show only those algorithms that include the word or phrase in their corresponding help files. To show all the algorithms again, make a search with an empty string.
To execute an algorithm, just double-click on its name in the toolbox.
Diálogo de algoritmos
Introducción
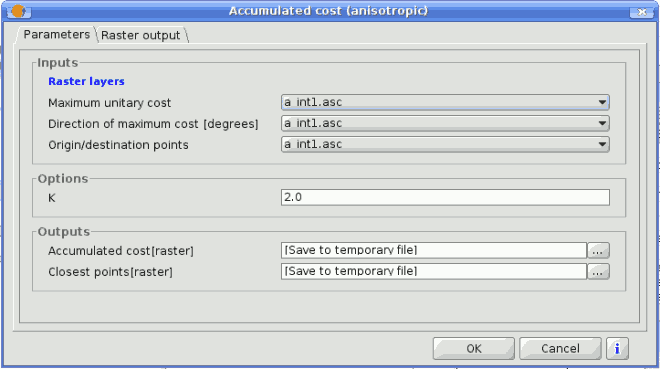
Once you double-click on the name of the algorithm that you want to execute, a dialog similar to the next one is shown (in this case, the dialog corresponds to the Anisotropic cost algorithm).
SEXTANTE dialog
This dialog is used to set the input values that the algorithm needs to be executed. There is a main tab named Parameters where input values and configuration parameters are set. This tab has a different content depending on the requirements of the algorithm to be executed, and is created automatically based on those requirements. On the left side, the name of the parameter is shown. On the right side the value of the parameter can be set.
Those algorithms that generate raster layers as output have an additional tab named Raster output. This tab is used to set the characteristics of those output raster layers, specifying its extent and its cell size. On the lower part of the window there is a help button. Click on it to see the context help related to the current algorithm, where you will find detailed description of each parameter and each output generated by the algorithm.
La pestaña de parámetros
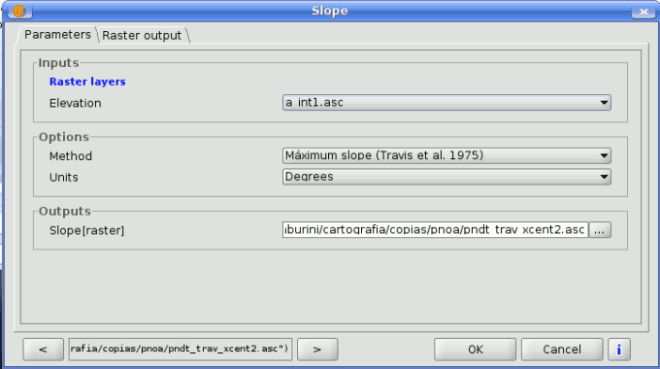
Although the number and type of parameters depends on the characteristics of the algorithm, the structure is similar for all of them. The parameters found on the parameters tab can be of one of the following types.
- A raster layer, to select from a list of all the ones available in the View.
- A vector layer, to select from a list of all the ones available in the View.
- A table, to select from a list of all the ones available in the View.
SEXTANTE raster dialog
- A method, to choose from a selection list of possible options.
- A numerical value, to be introduced in a text box.
- A text string, to be introduced in a text box.
- A field, to choose from the attributes table of a vector layer or a single table selected in another parameter.
- A band, to select from the ones of a raster layer selected in another parameter. In both this and the previous type of parameter, the list of possible choices depends on the value selected in the parent parameter.
- A list of elements (whether raster layers, vector ones or tables), to select from the list of the ones available in gvSIG View. To make the selection, click on the small button on the left side of the corresponding row to see a dialog like the following one.
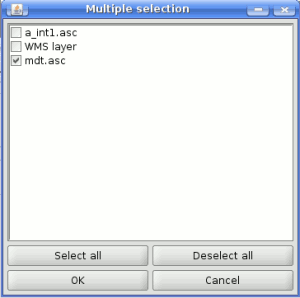
SEXTANTE multiple selection
- A file or folder
- A point, to be introduced as a pair of coordinates in two text boxes (X and Y coordinates)
- A small table to be edited by the user. These are used to defined lookup tables or convolution kernels, among other parameters.
Click on the button on the right side to see the table and edit its values.
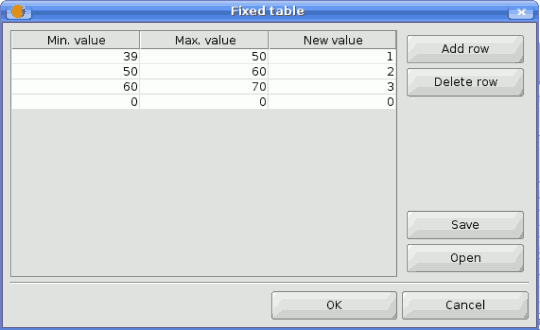
SEXTANTE filter table
Depending on the algorithm, the number of rows can be modified or not, using the buttons on the right side of the window.
La pestaña de salida raster
The Raster output tab is found in those algorithms that generate raster layers. Unlike in most GIS, when combining several raster layers as input for an algorithm, they do not have to have the same extent an cellsize in order to process them together. That is, layers don't have necessarily to match" between them. Instead, the characteristics of the output raster layer are defined and SEXTANTE performs the corresponding resampling and cropping needed to generate layer with those characteristics.
It is responsibility of the user to enter adequate values and be aware of the limitations of this mechanism, so as to generate cartographically correct results. (i.e. you can select a small cell size for the resulting raster layers, but if the input layers you are using have a bad resolution the results will not be geographically sound).
The following options are available in the raster output tab:
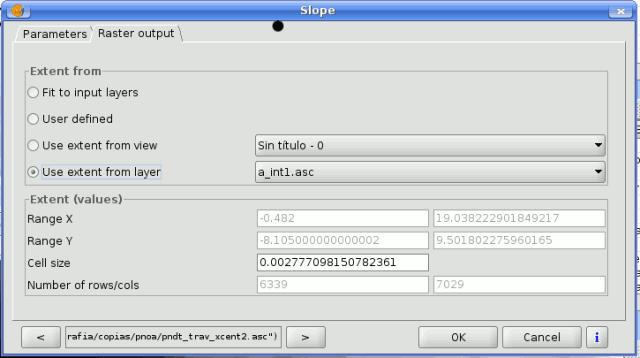
SEXTANTE raster output tab
- Fit to input layers. By default, the characteristics of the output raster layers are set based on the input ones. The minimum extent needed to cover all the input layers is used.
- User defined. The coordinates of the boundaries of the extent and the cellsize are both defined manually, entering the desired values in the corresponding text boxes.
- Use extent from view.. This option will let you use predefined extents from one of the views currently opened.
- Use extent from layer. The extent of a layer can be used as well to define the output characteristics, even if the layer is not used as input to the algorithm. If the selected layer is a vector one, the cellsize will have to be entered manually, since vector layers do not have an associated cellsize.
If an option other than the automatic fitting is selected, SEXTANTE will check that the values are correct and the resulting layers will not be too large (due to, for instance, a wrong cell size). If the output layers seems to large, SEXTANTE will show the next message dialog to ensure that the user really want those layer to be created.
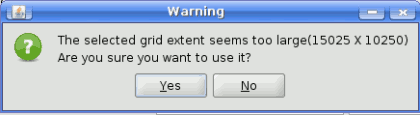
SEXTANTE size warning
Not all algorithms have the first option available, since not all algorithms that generate raster layers take some other raster layer as input. The interpolation algorithms, for instance, take a vector layer and create a raster one. The extent and cellsize of the latter has to be manually defined, since it cannot be set based solely on the input vector layer.
Objetos de datos generados por los algoritmos de Sextante
Data objects generated by SEXTANTE can be of any of the following types:
- A raster layer
- A vector layer
- A table
- A graphical result (chart, graph, etc.)
- A textonly HTML formatted result
Layers and tables can be saved to a file, and the parameters window will contain a text box corresponding to each one of these outputs, where you can type the desired file path. If you do not enter any file path, a temporal file name and folder will be used.
The supported formats for the SEXTANTE cartographic output files are as follows.
- shp
- dxf
- tif
- asc
To select a format, just select the corresponding file extension. If the extension of the file path you entered does not match any of the supported ones, the default extension (the first one in the list of supported ones) will be appended to the file path and the file format corresponding to that extension will be used to save the layer or table.
Graphics and texts are kept in memory and shown at the end of the algorithm execution in a new dialog. This dialog will keep the results produced by SEXTANTE during the current session, and can be shown at any time using the Results button. You can save graphical results as images in png format, and texts as HTML files. Rightclick on the name of the result in the tree on the left hand of the window and select Save as....
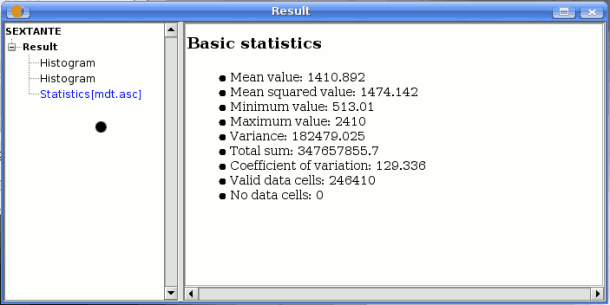
SEXTANTE statistics results
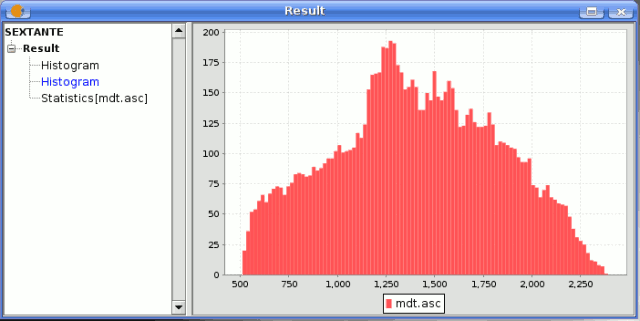
SEXTANTE graphic result
Ayuda contextual
Each SEXTANTE algorithm has its own context help file, which provides detailed information about the meaning of each input parameter and each output object, and gives hints about its usage. To access the context help system, click on the button that you will find in the algorithm dialog, or rightclick on its name on the toolbox and then select See help.
SEXTANTE help icon
The context help system contains not only information about each algorithm, but also description of each one of the elements of the SEXTANTE GUI like the text you are reading now. You will find it at the top of the tree on the left hand side of the help window. Just select an item to see its associated help file on the right canvas.

SEXTANTE help window (NOT AVAILABLE AT THE MOMENT)
Help files associated to each algorithm are stored as XML files, and can be edited using the help authoring tools included with SEXTANTE. Right click on the name of the algorithm in the context help window and select Edit help to get to the following window:

SEXTANTE edit help window (NOT AVAILABLE AT THE MOMENT)
On the left hand side you can select any of the elements to be documented (input parameter and outputs, along with other fixed field such as a general description of the algorithm). Then use the right hand side boxes to enter to text associated to that element or add images.
-----------------------------------
- Se ha producido un error en el documento Ayuda contextual , accediendo a la imagen stnt_help.png, que probablemente no existe. No se han encontrado alternativas
- Se ha producido un error en el documento Ayuda contextual , accediendo a la imagen stnt_edit_help.png, que probablemente no existe. No se han encontrado alternativas
